Starting from ListView
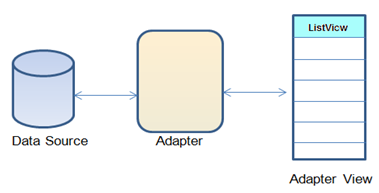
In Android development, ListView and RecyclerView are very important widgets. When I was first time to use ListView. The adapter and getView function really confused me. Functionality of adapter is to display data on the item view of the ListView. You can easily implement it follow the step in here. The following picture shows the simple principle of the adapter.

How the adapter works?
1. getListItemView
Let’s put ListView aside. We can use the Linear layout to implement a list structure to display data.
1 | // Main activity layout |
And we have a List of Items1
private List<Item> listItems;
When we setup UI, we need to find the item layout and put a item into the TextView then add the TextView into the main layout. Repeat this process through all items.
1 | protected void onCreate(Bundle savedInstanceState) { |
Now you can see that MainActivity is mainly a list structure. The function getListItemView can be considered as a simple adapter that converts the item data to a view.
2. ItemConverter
So let’s drag this function to a separate class ItemConverter.1
2
3
4
5
6
7
8
9
10
11
12
13
14
15
16
17
18public class ItemConverter {
private Context context;
private List<Item> data;
public ItemConverter(Context context, List<Item> data) {
this.context = context;
this.data = data;
}
public View getView(int position) {
View view = LayoutInflater.from(context).inflate(R.layout.list_item, null);
Item item = data.get(position);
((TextView) view.findViewById(R.id.list_item_text)).setText(item.text);
return view;
}
}
The mainly functionality of ItemConverter is getView function. It is the same function with getListItemView. Only difference is the augments changed from the item of the list to the position of the item in the list. And the oncreate function in MainActivity will be like this.1
2
3
4
5
6
7LinearLayout linearLayout = (LinearLayout) findViewById(R.id.linear_list);
ItemConverter converter = new ItemConverter(this, listItems);
for (int i = 0; i < listItems.size(); ++i) {
View view = converter.getView(i);
linearLayout.addView(view);
}
So we use a converter to do an adapter job in this case. And we can see very clearly how the getView function works and how the adapter converts data to a view.
3. OnBindViewHolder and CreateViewHolder
You can check the document for how to use ListView. Here not going to talk much about the convertView. There is one difference between ListView and RecyclerView is that RecyclerView is to force use to use ViewHolder. Let’s do it in ListView. For ListView the layout and basic setup you can check here. In this document, MyAdapter extends from BaseAdapter1
2
3
4
5
6
7
8
9
10
11
12
13
14
15
16
17
18
19
20public View getView(int position, View convertView, ViewGroup parent) {
ViewHolder vh;
if (convertView == null) {
convertView = LayoutInflater.from(context).inflate(R.layout.main_list_item, parent, false);
vh = new ViewHolder();
vh.itemText = (TextView) convertView.findViewById(R.id.main_list_item_text);
convertView.setTag(vh);
} else {
vh = (ViewHolder) convertView.getTag();
}
Item item = data.get(position);
vh.itemText.setText(item.text);
return convertView;
}
private static class ViewHolder {
TextView itemText;
}
Here you can see a simply way to cache a viewHolder. (time consuming of findViewById). In order to force user to use this ViewHolder, we need to drag this ViewHolder to a new abstract class called ViewHolderAdapter which extends BaseAdapter. And our MyAdapter extends ViewHolderAdapter.
In ViewHolderAdapter we override getView function here. Because in getView, we only care how the view created and how the data binded with the view. So we set two abstract functions here to create view and bind view holder, which will be implemented in MyAdapter.
1 | public abstract class ViewHolderAdapter extends BaseAdapter { |
1 | private class MyAdapter extends ViewHolderAdapter { |
Now you can check inside MyAdapter, that is how we use onCreateViewHolder and onBindViewHolder. For how to use RecyclerView, please check here. It is basically same process with our adpater.